Chicken Breast Air Fryer Time: How Long to Cook Perfectly
Learn precise chicken breast air fryer time and temperatures for juicy, safe results. This guide covers thickness-based timing, doneness tests, rest times, and common mistakes for home cooks exploring healthy, quick cooking.

Understanding chicken breast air fryer time
Timing for chicken breast in an air fryer hinges on several factors beyond the number on the recipe card. Thickness is the dominant variable: a thin cut will reach doneness quickly, while a thick cut requires more minutes and more attentive flipping to ensure the outer surface browns without overcooking the interior. The air fryer’s hot, circulating air can cook fast, but precision matters. According to Air Fryer 101, the most reliable method to land juicy, safe results is to measure the thickness of each breast, pat it dry to remove surface moisture, and use a thermometer to confirm doneness. If you treat time as a range rather than a fixed target, you’ll accommodate model differences across appliances and baskets. Emphasize even thickness and even air flow for uniform cooking.
Thickness and size: timing variability
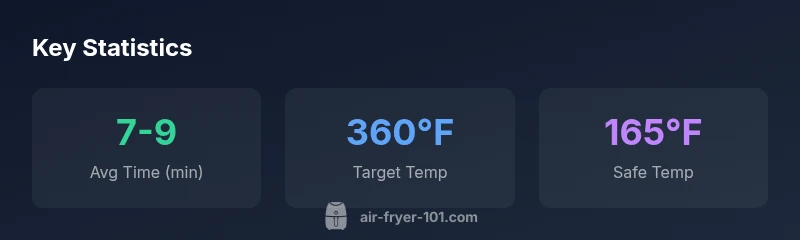
Thickness is king when timing boneless, skinless chicken breast in an air fryer. A 0.25 inch (6 mm) piece will cook noticeably faster than a full 1 inch (25 mm) cut. Translating thickness to time, you’ll typically see about 6–8 minutes for the thinnest portions at 360°F, 9–10 minutes for a half-inch slice, and 12–14 minutes for thicker portions. If a breast is uneven, consider pounding to a uniform thickness to prevent overcooking on the edges. Always flip halfway to maximize browning on both sides. For extra browning, you can brush a light layer of oil or use a spray to encourage crisp edges without excessive fat.
Temperature and airflow: how they shape results
Temperature and airflow interact to determine the crust and juiciness. A consistent 360°F is a common baseline for boneless, skinless chicken breast. Some cooks prefer 380°F for a bit faster browning, but this can edge toward dryness in thinner pieces. Air fryer models vary in how quickly they reach and maintain temperature; a model with strong fan circulation may cook more evenly with slightly shorter times. If you’re modifying time, do so in increments of 1 minute and check doneness with a thermometer after each interval.
Step-by-step timing guide for common sizes
To apply thickness-based timing, start by measuring the breast thickness, then follow these steps:
- Preheat the air fryer if your model recommends it.
- Lightly coat the surface with oil or cooking spray and season as desired.
- Place breasts in a single layer with space between pieces.
- Start with the base time for thickness, then check internal temperature at the minimum end of the range.
- Flip halfway through for even browning, then resume cooking until the thermometer reads 165°F (74°C).
- Remove and rest for 2–5 minutes before slicing to redistribute juices.
Doneness tests and resting for juiciness
Rely on a digital meat thermometer to verify doneness rather than visual cues alone. Target an internal temperature of 165°F (74°C). After removing from the air fryer, let the chicken rest 2–5 minutes; this short rest helps the juices reabsorb and keeps the meat moist when sliced. If you’re preparing multiple breasts of varying thickness, consider removing the thinner pieces first and letting the thicker ones finish, then rechecking the temperature before serving.
Common mistakes and how to fix them
Common mistakes include not preheating, cooking from uneven thickness, and skipping the rest period. Preheating ensures a consistent start temperature; pounding to even thickness reduces the risk of overcooked edges; and resting helps maintain juiciness. Another pitfall is overcrowding the basket, which slows air circulation and results in uneven browning. Finally, using heavy marinades can add moisture weight that slows browning; a light oil and dry rub is often a better approach for crisp exterior and juicy interior.
Quick calculator: estimating times by thickness
A practical approach is to use a simple thickness-to-time rule: multiply thickness (in inches) by a factor to estimate minutes, then round to the nearest minute and verify with a thermometer. For example, a 0.4 inch breast might land around 7–8 minutes, while a 0.75 inch breast would be closer to 12–14 minutes. Always start at the lower end of the range and test with a thermometer to ensure you hit 165°F.