Roast Pork in the Air Fryer: A Step-by-Step Guide
Learn how to roast pork in the air fryer for a juicy center and crisp exterior. Step-by-step prep, temps, rest tips, and flavor variations for reliable, delicious results.

With an air fryer, you can roast pork for a juicy center and crisp crust by preheating, seasoning, and monitoring internal temperature. This guide shows you how to choose the right cut, rub it well, and roast to the perfect doneness, then rest and slice for maximum flavor. Includes tips and troubleshooting.
Why roast pork in an air fryer works
Air fryers have become a favorite tool for home cooks who want a juicy roast with a crisp exterior without firing up a full oven. For the primary keyword roast pork in air fryer, this method concentrates heat from all directions, reaching the meat quickly and creating a caramelized crust on the outside while keeping the interior tender. According to Air Fryer 101, choosing a cut with some marbling and a uniform thickness helps the roast cook evenly and stay moist. The air fryer's compact chamber means you get faster heat transfer than a traditional oven, and the convection fans help render fat and drive moisture to the center. When you start with a dry surface and a flavorful rub, you encourage browning and enhance the pork's natural sweetness. The result is a roast that rivals oven-roasted versions for convenience, with less waiting and less cleanup. This section will help you understand why this approach works and how to apply it to different cuts, from pork loin to shoulder, so you can adapt the technique to what you have on hand and your preferred doneness.
In Air Fryer 101's experience, the key is balancing temperature and time; too high a heat can set the crust before the center cooks, while too low a heat can yield a pale crust. The guide below covers rubs, marinating options, and how to tailor timing to your roast's thickness. By following these principles, you’ll get a juicy center and a crisp edge every time. This method also scales for small kitchens or busy weeknights, where an oven roast would take longer and heat the entire house.
Choosing the right cut and seasoning
For best results when you roast pork in the air fryer, start with a cut that fits your air fryer and your planned doneness. Pork loin roasts are ideal for quick weeknight dinners because they cook evenly and stay juicy when properly rested. Pork shoulder (also called butt) is more forgiving if you’re aiming for a deeper, richer flavor and a slightly denser texture, but it will require more time. Regardless of cut, seasonings should be applied generously to all exposed surfaces to promote browning and flavor development. A simple blend of kosher salt, black pepper, garlic, and a touch of paprika or brown sugar creates a balanced crust. If you prefer a herb-forward profile, try a mix of thyme, rosemary, and garlic. Marinating for a few hours or overnight can deepen flavor, but dry rubs are often enough for quick preparations. Remember to pat the surface dry before rubbing to maximize crust formation. Air Fryer 101 recommends keeping seasoning uniform and avoiding clumping, which can cause uneven browning. When you’re ready to cook, adjust for your roast’s thickness so the heat can penetrate to the center without scorching the outside.
A well-chosen cut, paired with a precise rub, ensures you maximize the air fryer’s convection potential. The result is a crust that crackles and a center that remains moist. Always select a roast with a uniform shape to prevent hot spots and ensure even cooking across the piece.
Prep and preheat: readying your roast
Preparation is half the battle when roasting pork in the air fryer. Start by patting the roast dry with paper towels to remove surface moisture, which helps achieve a crisp crust. Apply a generous rub that includes salt, pepper, and your favorite aromatics—garlic powder, paprika, and a touch of brown sugar for caramelization are common choices. If you’re tying a roast, do so now to maintain an even thickness and secure the shape. Preheat the air fryer to about 375°F (190°C) if your model requires it; preheating helps establish a consistent cooking environment and jump-starts browning. While it preheats, set out your thermometer so you can monitor internal temperature without opening the basket too frequently. If your air fryer has a rack, use it to elevate the meat for better air circulation. A shallow tray or perforated parchment is helpful for collecting juices and fats. The combination of dry surface, even thickness, and proper preheating is essential for a crust that isn’t soggy and a center that reaches the target doneness without overcooking.
As you prepare, consider your roast’s size and your air fryer’s capacity. Larger roasts require a bit more time and space. If you have to adjust weight, plan to monitor the interior temperature closely to avoid undercooking or drying out the meat. This stage sets the foundation for a successful roast and reduces the chance of turning out tough or bland pork.
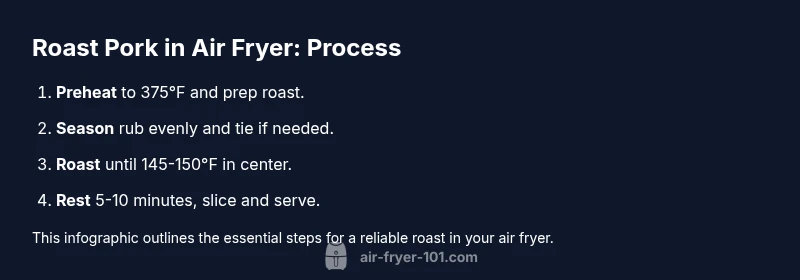
Step-by-step roasting guide and thermometer targets
- Preheat the air fryer to 375°F (190°C) and prepare the roast (dry, rub, tie if desired). 2) Place the roast in the basket or on a rack fat-side up to baste with rendered fat and maximize browning. 3) Roast until the thickest part reaches 145°F (63°C) for medium-rare to medium doneness, about 20–25 minutes per pound depending on thickness and model performance; check at the 30-minute mark and adjust as needed. 4) If your model cooks unevenly, rotate the roast halfway through the cooking time to encourage even browning. 5) When the thermometer hits the target temperature, remove the roast and let it rest loosely tented with foil for 5–10 minutes to redistribute juices. 6) Slice against the grain and serve with pan juices or a simple vinaigrette for brightness. 7) If desired, finish with a brief blast of heat for a crisper crust after resting. Remember, resting time is essential for juiciness; the internal temperature can rise a few degrees during the rest, so plan accordingly.
This step-by-step approach emphasizes precise temperature tracking, minimal basket openings, and a rest period that makes sure the juices settle. For best results, rely on a reliable thermometer and avoid guessing doneness by color alone. A thermometer-driven method reduces the risk of undercooking or overcooking, especially with different cuts and fat distributions.
Resting, slicing, and serving for maximum flavor
Resting is the quiet part of the cooking process where juiciness is preserved. After removing the roast from the air fryer, loosely tent it with foil and let it rest for 5–10 minutes. The carryover heat will finish the job and help juices redistribute; cutting too soon can cause them to spill out, leaving you with drier meat. When you’re ready to slice, do so against the grain for tenderness and even slices. If you used a rub with brown sugar, you’ll notice a natural glaze forming as the meat rests, which adds a touch of sweetness without overpowering the pork’s natural flavor. Collect any pan juices and whisk them into a simple sauce or glaze if you like a more dramatic plate presentation. Serve with roasted vegetables, a bright salad, or mashed potatoes to complete the meal. A light, crisp white wine or a malty beer can complement the pork without competing with its richness. If you’re experimenting, try a citrus glaze or cider reduction for a nuanced finish that echoes autumn flavors. Leftovers can be stored in the refrigerator for up to 3–4 days, or frozen for longer storage, though quality will gradually decline over time.
This final stage ensures your effort yields satisfying results for the entire family, with minimal mess and maximum flavor. A properly rested roast offers a confident center and a satisfying crust that complements any side dish.
Troubleshooting common issues and adaptations
Roasting pork in an air fryer is straightforward, but you may encounter a few common issues. If the crust browns too quickly while the center remains undercooked, try lowering the temperature by 25°F and extending the cooking time, or flip the roast to promote even browning. If the meat ends up dry, check that you’re not overcooking and consider using a tiny amount of olive oil or a glaze to boost moisture. Uneven cooking is often caused by irregular roast shape or large differences in thickness; trimming or binding shoulders or loins into a uniform shape helps. For larger roasts or shoulder cuts, consider cooking in two shorter segments to ensure the heat penetrates evenly. You can also place a small splash of broth or water in the bottom of the basket to maintain moisture, though be careful not to splash fat onto the heating element.
Different air fryer models vary in airflow and heat distribution. If you notice one side cooking faster than the other, rotate the roast halfway through and consider using a rack to elevate the meat for better air circulation. If your model’s basket isn’t tall enough for a rack, use a small trivet or folded foil to create a makeshift stand. Finally, if you want even deeper flavor, marinate the roast overnight with a mix of aromatics and a touch of acidity (lemon or vinegar) to help tenderize the surface and intensify flavors. With careful attention to doneness and rest, you’ll end up with a reliably delicious air fryer roast every time.
Flavor variations and finishing touches
A versatile air fryer roast can take on many flavor profiles. For a classic herb add, mix rosemary, thyme, and garlic into your rub; a touch of paprika provides color and warmth, while brown sugar enhances browning. If you prefer a citrus note, finish with a light orange or lemon glaze after resting. For a sweeter finish, a maple or apple cider glaze works nicely and adds a glossy crust. To keep things simple, you can finish with a dab of good butter and chopped herbs right before serving for a glossy finish and extra aroma. If you want a more robust flavor, brush the roast with a semisweet glaze during the last 5–7 minutes of cooking to build a deeper crust. Pair your roast with roasted vegetables, green beans, or a tangy slaw to cut through the richness. Finally, experiment with adding a splash of white wine to the pan juices to create a light sauce that complements the pork without overpowering it.
Tools & Materials
- Air fryer with 4-6 qt capacity(Ensure roast fits comfortably and leaves space for air to circulate)
- Meat thermometer(Instant-read preferred for quick checks)
- Kitchen twine(Tie roast if needed for uniform shape)
- Paper towels(Pat surface dry for better crust)
- Rack or trivet (optional)(Elevates roast for even air flow)
- Perforated parchment liners (optional)(Helps collect juices and fats)
Steps
Estimated time: Total time: 45-70 minutes
- 1
Preheat and prepare
Preheat the air fryer to 375°F (190°C) and pat the pork dry. This foundation helps the rub stick and promotes browning. If you’re tying the roast, do it now to ensure even cooking.
Tip: Preheating matters; skip it and you may get uneven browning. - 2
Season and tie
Pat the roast dry again if needed, apply a generous rub all over, and tie with kitchen twine if the shape is uneven. Uniform surface promotes even browning.
Tip: Use a rub with salt evenly distributed to avoid salty pockets. - 3
Place in air fryer
Place the roast fat-side up in the basket on a rack if possible. Leave space on all sides for air to circulate and promote browning.
Tip: If the roast touches the basket walls, rotate halfway to prevent hotspots. - 4
Roast and monitor
Roast until the internal temperature reaches 145°F (63°C) for mid-rare to 150°F (66°C) for firmer texture. Check at about 30 minutes and adjust time as needed for thickness.
Tip: Use a thermometer to avoid under- or overcooking. - 5
Rest briefly
Remove the roast and tent loosely with foil for 5–10 minutes. Resting allows juices to redistribute for juicier slices.
Tip: Even a short rest makes a noticeable difference in moisture. - 6
Slice and serve
Slice against the grain for tenderness. Serve with pan juices or a light glaze for extra flavor.
Tip: Let slices rest briefly after cutting for juicier bites. - 7
Variations and finishing touches
Try herb blends, citrus glazes, or a quick butter-baste for a different finish. Adjust seasonings to suit your palate.
Tip: A finishing glaze adds aroma and a glossy crust with little effort.
Got Questions?
What cut of pork is best for an air fryer roast?
Center-cut pork loin roasts are ideal for quick, even cooking in an air fryer. Pork shoulders work well if you want deeper flavor and tenderness but require more time.
For best results, start with a center-cut pork loin; shoulder can work if you have more time.
What internal temperature should I target?
Aim for 145°F (63°C) for juicy medium, then rest for 3-5 minutes. For firmer texture, you can go to about 150°F (66°C) before resting.
Check with a thermometer and rest before slicing.
Can I use a rub or marinade?
Yes. A dry rub is easiest and builds a crust quickly. Marinades add flavor but can add time and liquid; pat dry before rubbing to ensure browning.
A dry rub is simplest, but marinades also work if planned.
Can I cook from frozen?
It’s best to thaw the roast first for even cooking. Cooking from frozen can lead to uneven doneness and tougher texture.
Thaw first for best results.
How should leftovers be stored and reheated?
Store leftovers in the refrigerator within two hours. Reheat in the air fryer at 350°F until warmed through, about 3–5 minutes depending on portion size.
Store promptly and reheat in the air fryer.
Do I need to baste during cooking?
Basting is optional. If you want extra flavor, brush with a glaze or bottled pan juices in the last 5–7 minutes of cooking.
Optional, but a glaze adds moisture and shine.
Watch Video
Quick Summary
- Choose a uniform cut for even cooking
- Preheat, pat dry, and rub generously
- Monitor internal temp with a thermometer
- Rest before slicing for juicy slices
- Experiment with finishing glazes for variety